My very dear friend and ultra-talented quilter, Sue Stewart, and I have been participating in a fun, “Friendly Challenge” for the past couple of years. You can read more about how this began by CLICKING HERE and HERE. The guidelines are fairly straightforward. We always start with a fat quarter bundle of Cherrywood Fabrics (one bundle for each of us) and we add one additional focus print, one contrasting fabric and one background fabric. The quilts must be 54″ square. For the first challenge, we each made four 16″ blocks and then swapped those blocks and fabrics for the other person to finish. For the first challenge, I chose a group of bright, tropical colors. 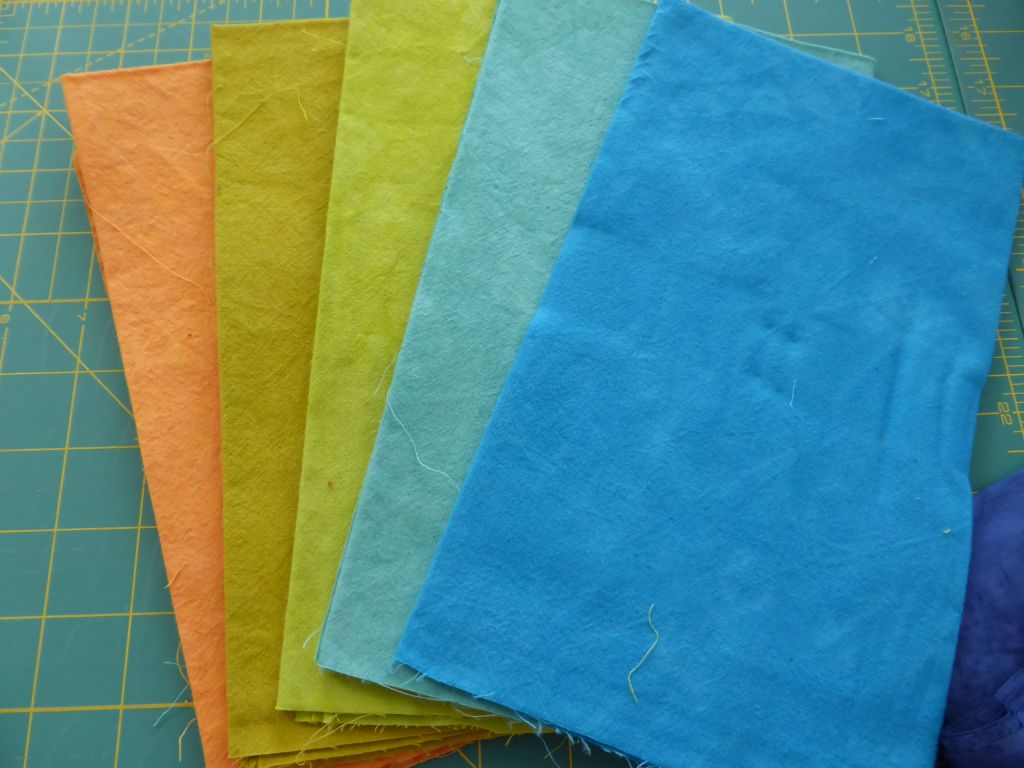
Prior to working on our second Friendly Challenge, we agreed to participate in a “Challenge within a Challenge” for Cherrywood Fabric’s Lion King Challenge in 2016. For this, we each began by making a 12″ block and then sending it to the other person to complete. It should be noted that originally, the Lion King Challenge was announced as “King of the Jungle” Challenge until Disney became involved in sponsoring the contest and exhibit and the name was changed. Sue had already designed her block around the concept of the “backyard jungle” to create her original block. Working on these small challenge quilts was such fun! Read more about this HERE and HERE. These are our finished, joint entries:
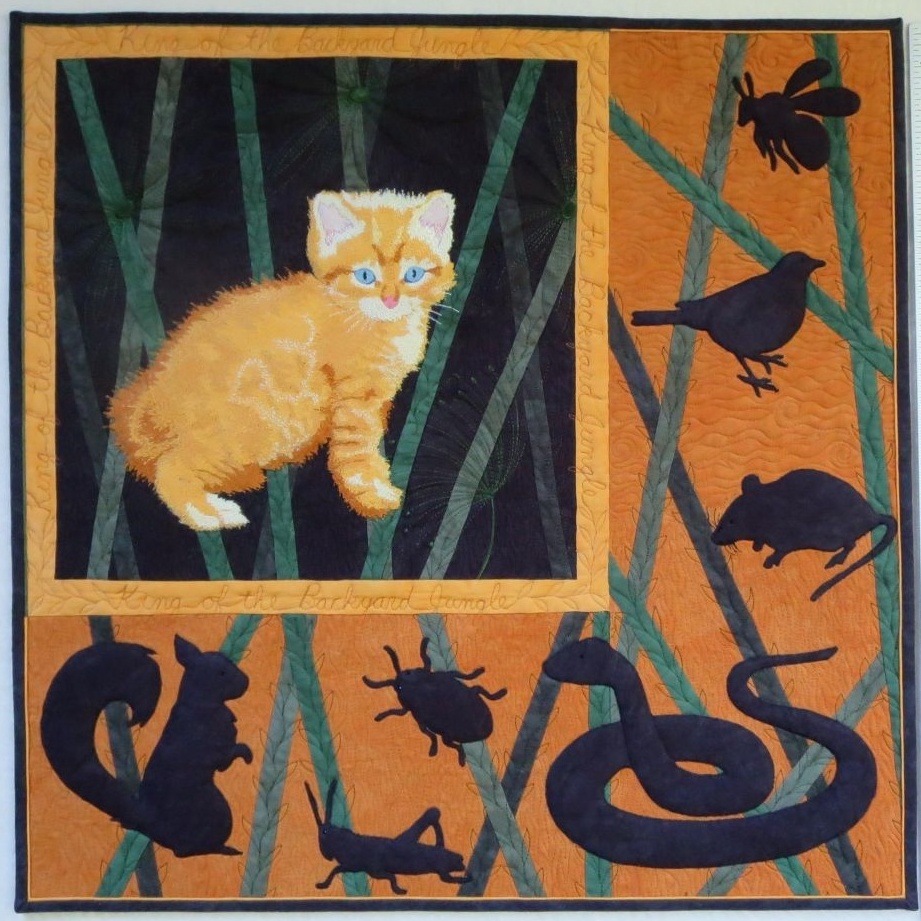
King of the Backyard Jungle by Sue Stewart and Kimberly Einmo.
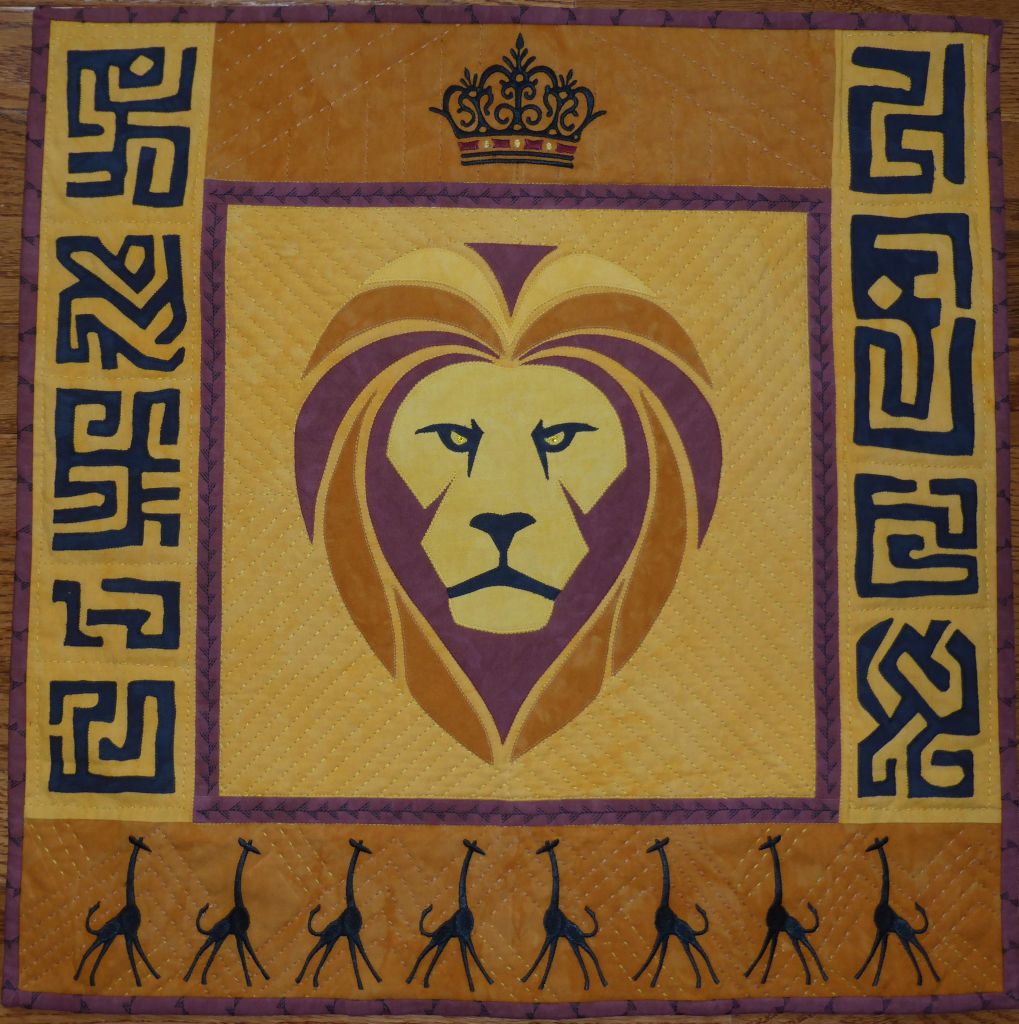
“Challenge within a Challenge” by Kimberly Einmo and Sue Stewart.
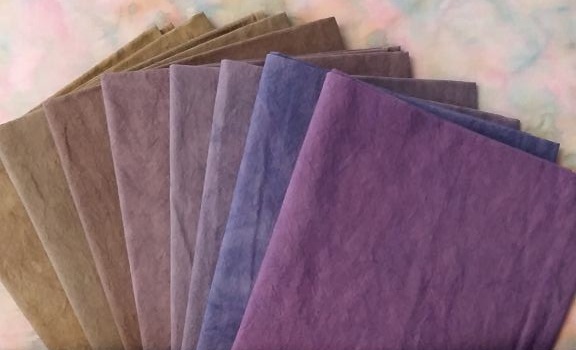
For our second Friendly Challenge, Sue chose a group of Cherrywood Fabrics called Thistle. I must admit, I was surprised because they are so different than the clear, saturated colors I favor. These fabrics, while pretty, were “muddy” in comparison to the first group we used and I found the grays very challenging to use. Ok, let’s be really honest. Those gray fabrics had me completely stumped!
For this challenge, we opted to each make a 20″ square block for a medallion style quilt and we traded those blocks at an industry event in January, 2016.
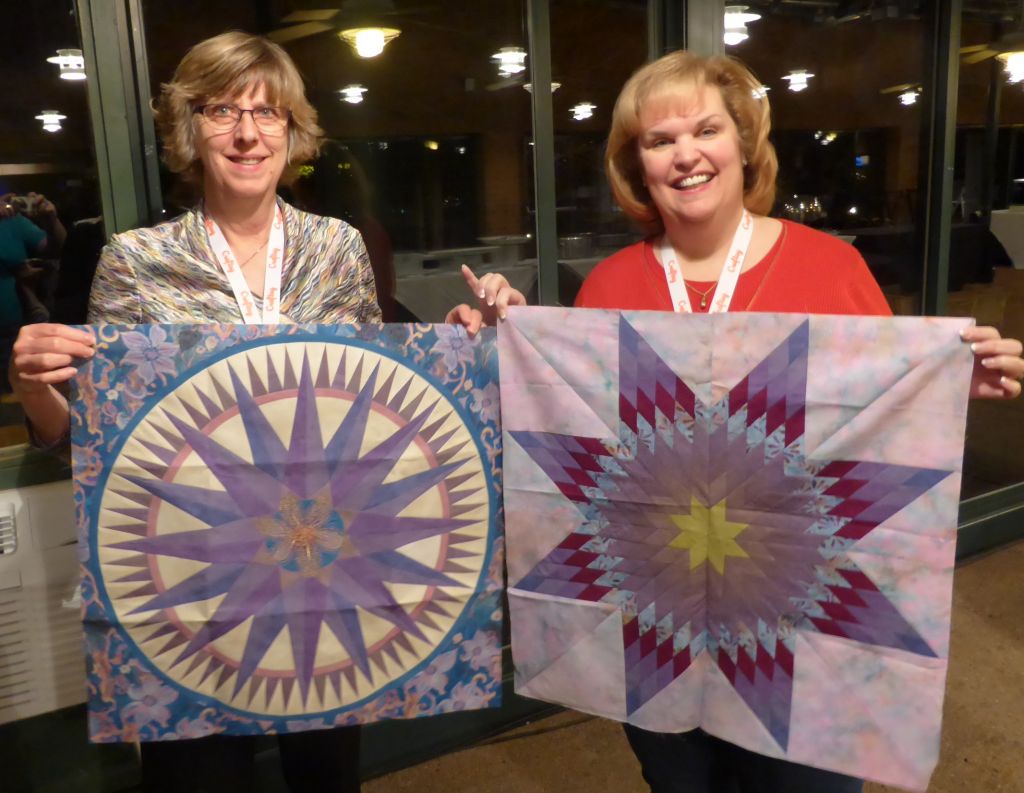
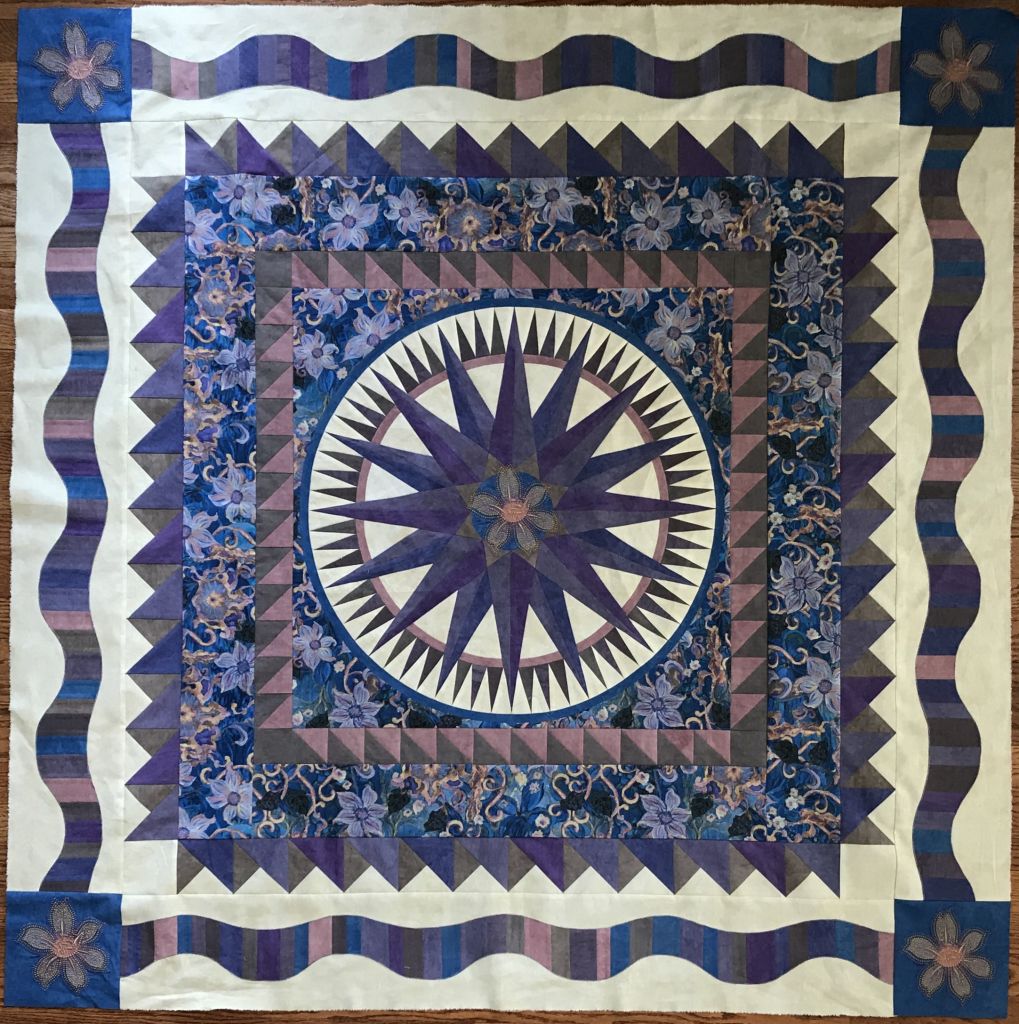
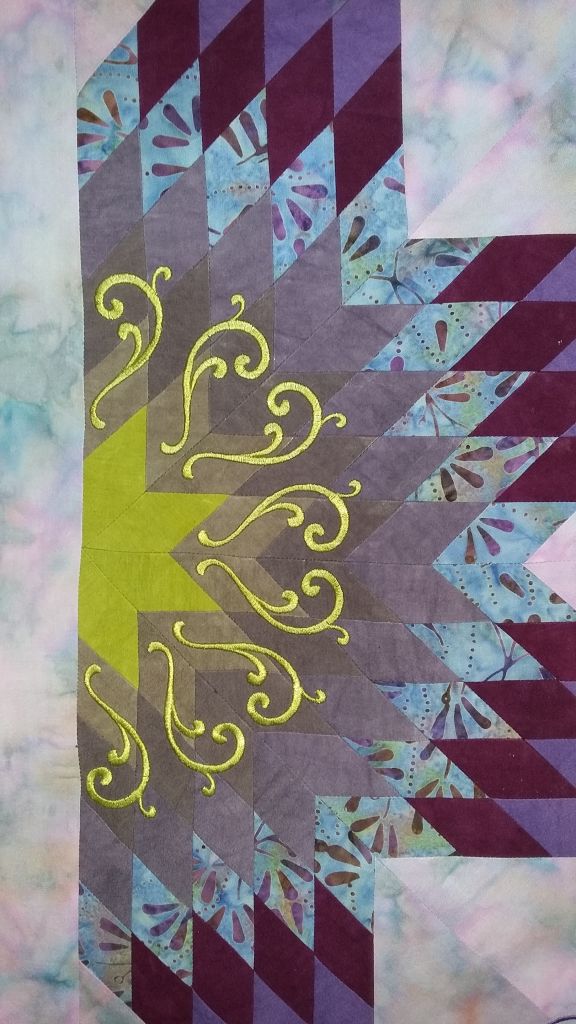
Sue made the Mariner’s Compass block and I made the Lonestar block. We swapped these blocks, along with additional fabrics, in early 2016.
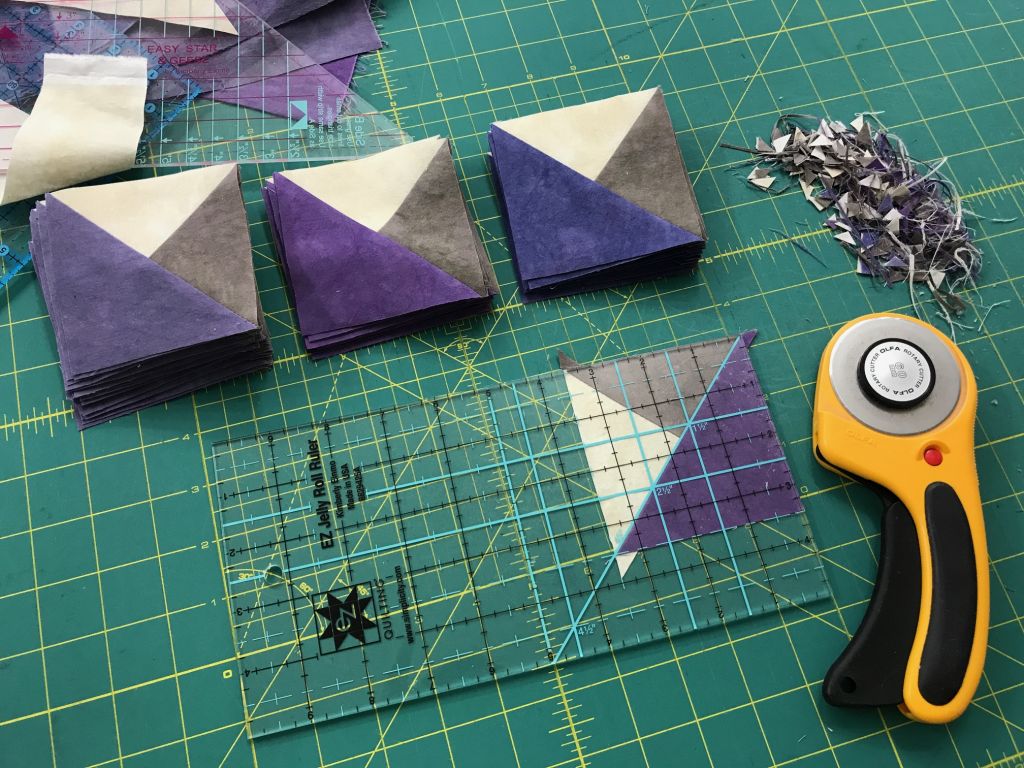
Making the original, center block was the easy part. I was so in awe of Sue’s Mariner’s Compass block but at the same time, I was secretly terrified because I knew I needed to come up with a completely brilliant design to compliment her exquisite piecing. And those grays. What to do with those grays? How would I be able to incorporate them effectively? I struggled for months (and months and months) with the outer border treatment. My mind was stuck on the idea I needed to use partial Mariner’s Compass blocks in the outside borders. The trouble with that idea was the fact I don’t like to do paper piecing. And yet, I couldn’t imagine making Mariner’s Compass blocks without a foundation piecing method! It felt like I hit a wall, creatively speaking.
After months of stewing about the idea and quite honestly, procrastinating about what I would do, I came to the conclusion I didn’t have to construct Mariner’s Compass blocks — or any portion of those super-spikey points — to create a well balanced quilt design. This simple concept, which in effect was giving myself permission not to make Mariner’s Compass blocks, was my “light bulb” moment. I came to the conclusion the center Mariner’s Compass block would be the “star” of the entire design and the additional border elements could be supporting cast members. So I used Electric Quilt design software (EQ7) and I selected a variety of simplistic, pieced units for border treatments. Ultimately, I chose HSTs and triple-triangle units and I played with subtle fabric and color placement to keep the eye moving around the center of the quilt. The idea worked!
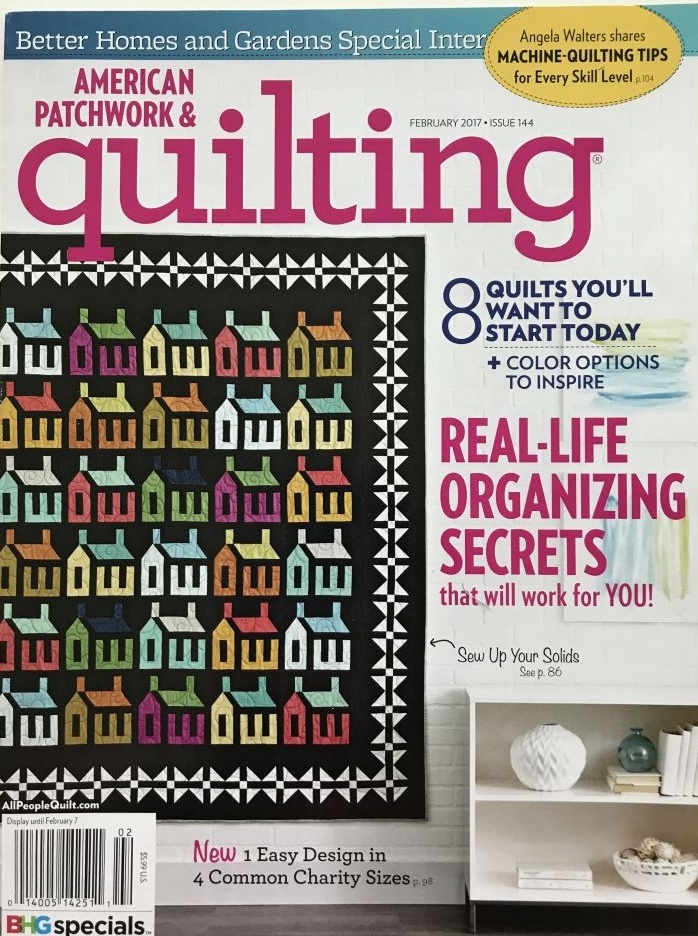
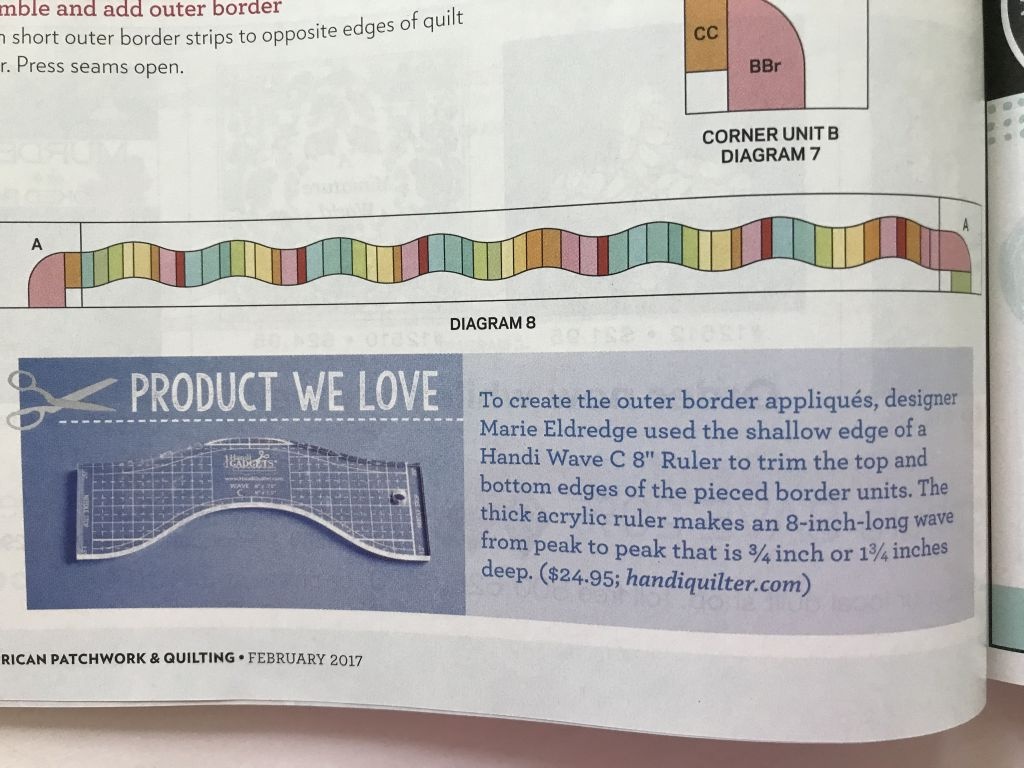
Then an issue of American Patchwork and Quilting arrived in my mailbox and I saw an interesting border treatment on one of the featured quilts that caught my eye.
It required a special ruler/template so I ordered one. I love trying new-to-me methods and this was something I had never done before.
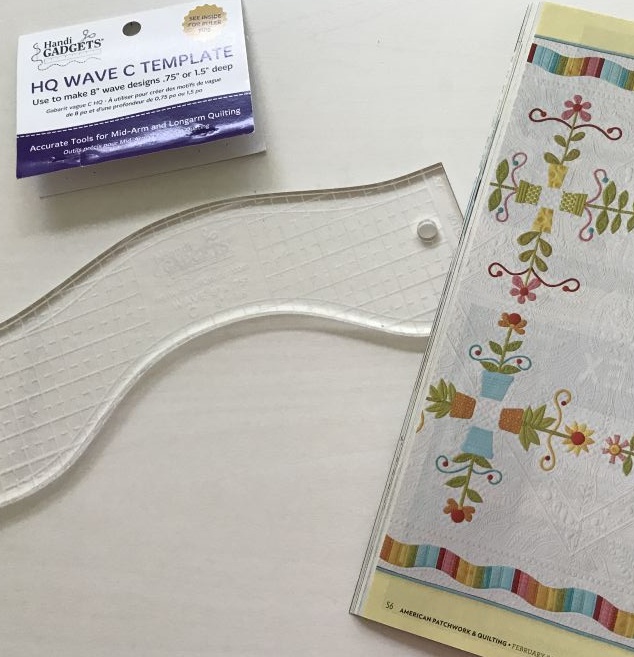
February 2017 issue of American Patchwork and Quilting Magazine. Quilt designed by Marie Eldredge of Handi Quilter called Fanciful Flowers.
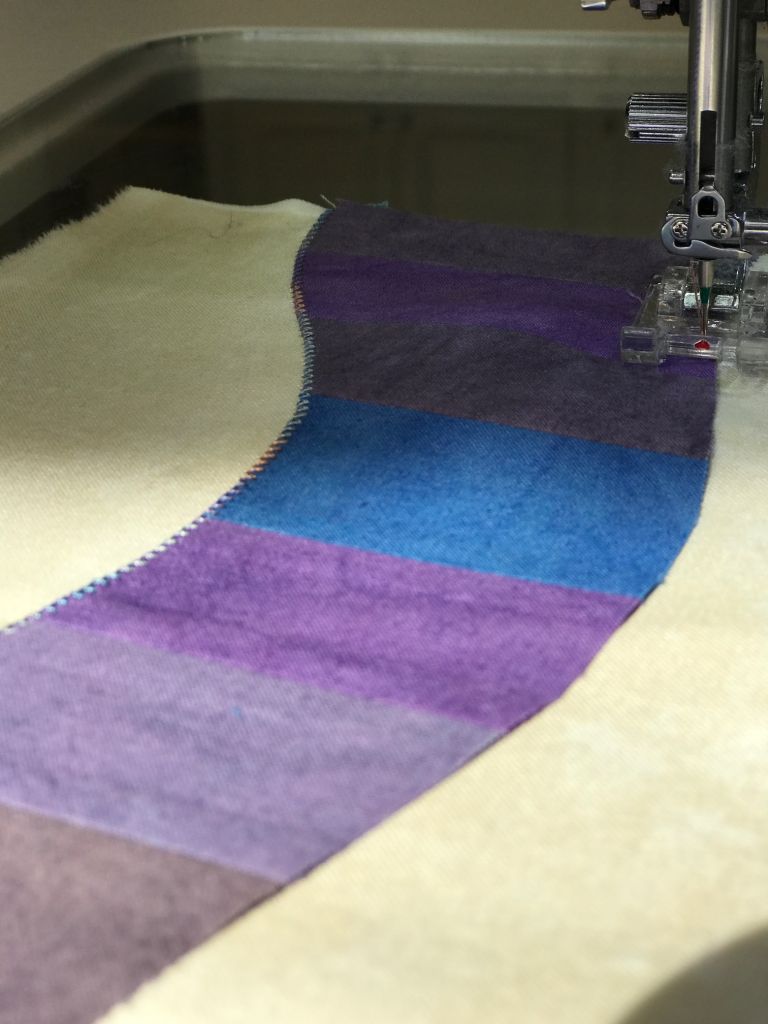
I used Soft Fuse to fuse the randomly pieced, wavy border to background fabric and finished the raw edges with a small zig-zag stitch on my machine using a pretty, variegated thread color.
Ultimately, I love the results! I’m completely happy with the finished quilt top and the biggest bonus is that it lays perfectly, beautifully, wonderfully flat!
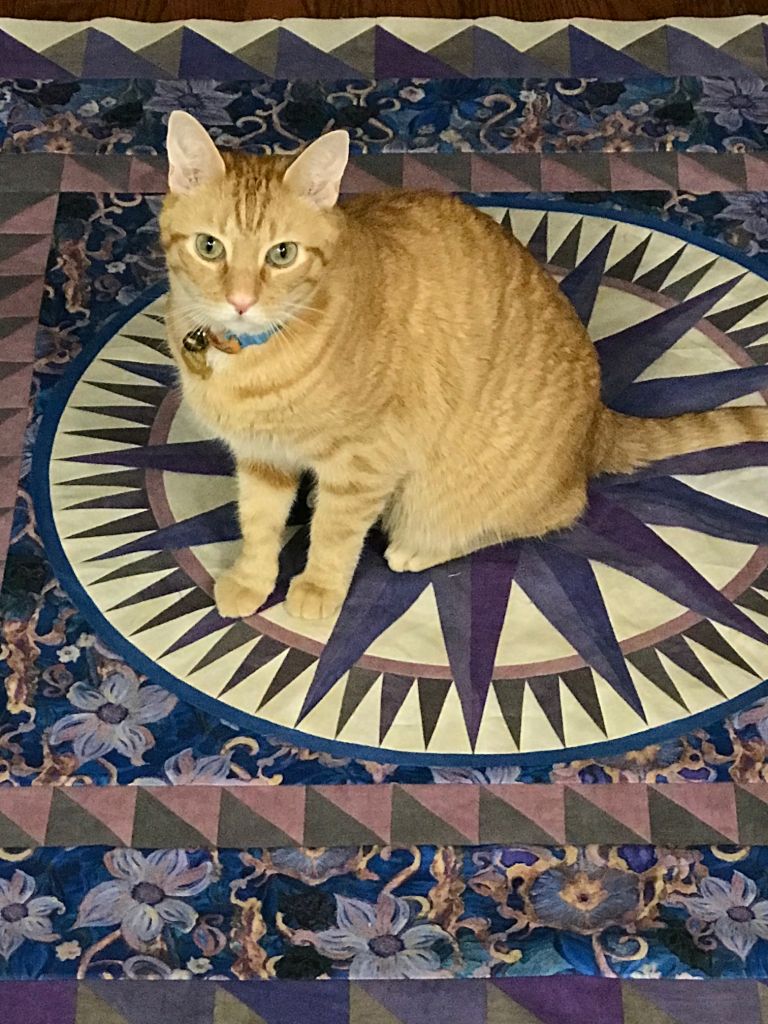
Toby loves to photo bomb my quilt pics!
This quilt was an extreme challenge for me. I’m so grateful Sue originally invited me to participate in these challenges. Her talent and precision make me step-up and really think outside of my creative “box.” I have to take an in-depth look at things from a fresh, original perspective and this, in turn, makes me stretch my skills and grow as a quilter. I learned many things from this particular challenge. I learned how to consider different approaches for effective design elements. I learned that procrastinating is a far-worse, self-imposed punishment (all those months spent worrying about how to tackle dull fabric colors and the fear I might actually have to paper piece, for starters) than actually facing my doubts and creating a suitable, alternative result. I learned I need to keep raising the bar to do better and continue to improve with each quilt I make. And I’m so thankful for Sue for being patient while I worked through these issues.
I’ve already made the binding and the hanging sleeve. Now I need to tackle the issue of quilting this beauty!
Challenge #2, made by Sue Stewart and Kimberly Einmo.
Details of the partial border treatment of the quilt Sue finished in Challenge #2.
Sue finished my original Lonestar block in stunning fashion! I absolutely love the embroidered elements she added combined with exquisite quilting. Love, love, L-O-V-E!
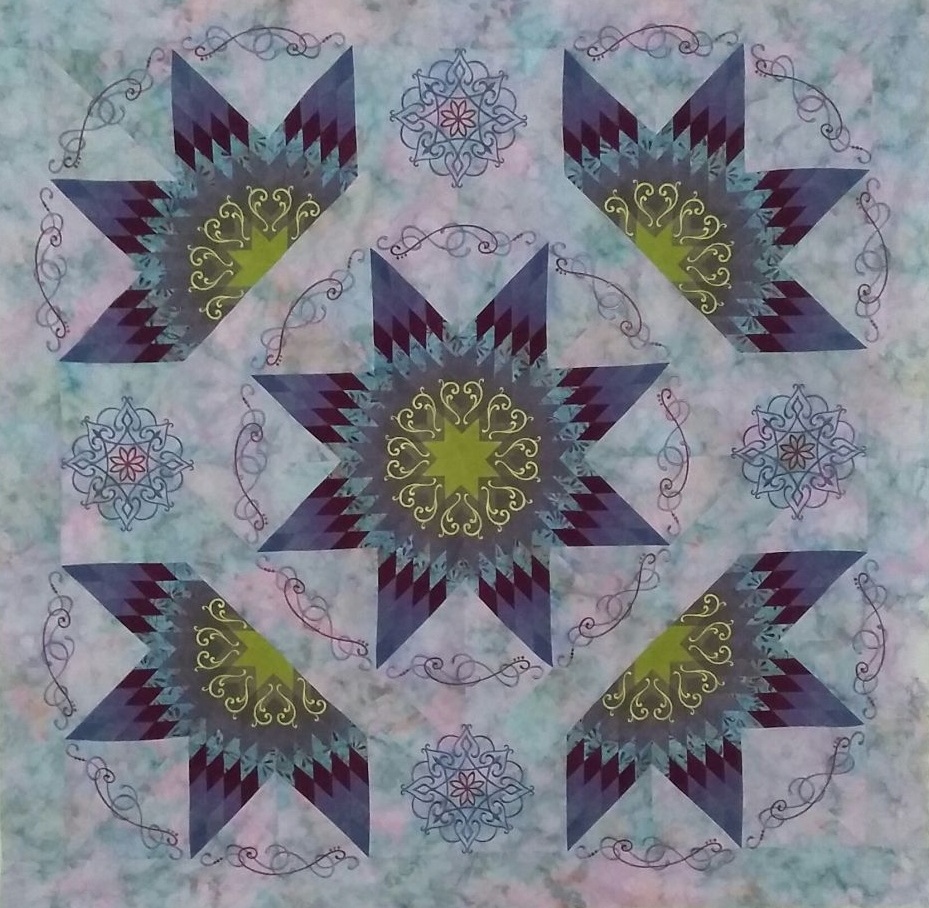
Challenge #2 made by Kimberly Einmo and Sue Stewart.
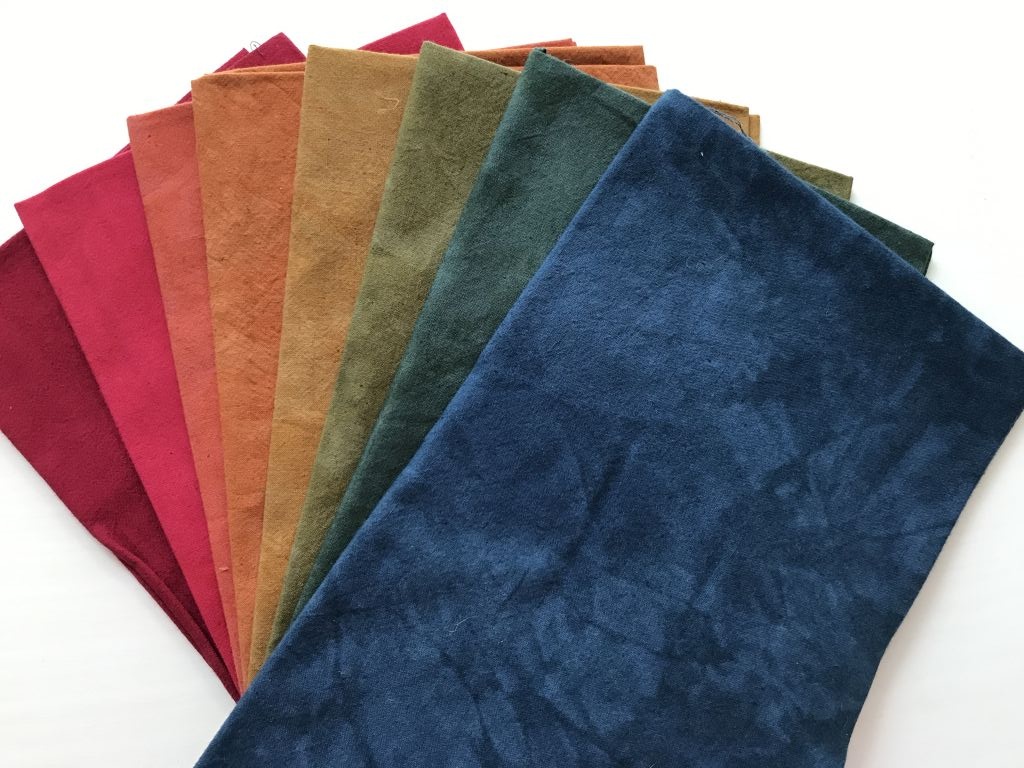
What’s next? Challenge #3. It was my turn to select the next Cherrywood Fabric group (Texas Ranch) for the challenge and I chose these gorgeous colors.
I’m off to make some pretty blocks for this next challenge, and I’ll post photos of the completed Challenge #2 Mariner’s Compass Quilt when it is quilted and bound. Stay tuned!


What a wonderful way to share your love of quilting with a friend. When I was in a guild we did a similar project, a round robin, with groups of 4. It was a lot of fun. My youngest daughter participated in one with me. It is a great sharing experience. Thanks for showing your quilts.
Beautiful! You two are extremely talented quilters. You inspire me!!
How fun! And I think orange cats are all about photo bombing quilt pictures. My orange and white cat, Snickerdoodle, loves to photo bomb my quilt pics.
Kimberly, I have worked your patterns for several quilts and really liMe to follow your designs. I love to hear how you were challenged with design but came to the most elegant quilt. Love Love it. Thank you for all that you bring to us. Barb Stein
Hi Kimberley.
Your quilt is amazing. It’s very encouraging to hear that an experienced quilter such as yourself struggles with how to complement another person’s beautiful work-especially when they are a good friend.
I think that how you handled the challenge was very wise and the end result complemented Sue’s amazing work beautifully.
Very happy to see Two Talented Friends work closely together making Awesome Quilts. I wish I was nearer to be able to join the challenge. All love from Dudu