Unattainable goal or within easy reach?
Quilters the world over continually strive to perfect the elusive scant 1/4″ seam allowance much like golfers strive for a hole in one or gourmet chefs painstakingly prepare the perfect souffle. The truth is, the perfect scant 1/4″ seam allowance is something every quilter can master with the right tools and practice. If you love precision piecing as much as I do, then stitching the perfect scant 1/4″ seam allowance is something you strive for every time you sit at the sewing machine to piece your fabrics into pretty blocks. And you want to be able to do it with ease.
For years, I’ve heard quilters discuss and debate what actually constitutes the perfect scant 1/4″ seam. If you ask twenty different quilters you’ll likely get twenty different answers. And if you put those same twenty quilters in front of their sewing machines and ask them to stitch a scant 1/4″ seam, you’ll likely get twenty different variations measuring anywhere from a much-too-skinny 1/8″ to a chunky 1/4″ seam. So why all the fuss?
Why do quilters need to use a scant 1/4″ seam?
When it comes to pieced units in quilting (unlike appliqué), it truly is all about the math and in particular, geometry. Units such as squares, rectangles, and triangles need to be cut accurately then sewn together accurately so they will measure accurately when the units are combined to create a larger block.
Unlike garment sewing where the industry standard is a 5/8″ seam allowance, piecing dictates a 1/4″ seam be used to sew fabric units together to create pieced blocks. Somewhere way back in history, quilters realized in order for seams to be pressed to one side they needed to allow for the bulk of the fabric itself to be folded over. A scant 1/4″ seam was far more effective and accurate to allow for this fabric bulk taking up space in the seams.
Even the weight of the thread you use to piece your seams produces bulk and takes up space! For instance, have you ever pieced your blocks with 50wt thread and then switched to 30wt or 40wt thread and continued to piece your units? If not, try it. It will feel like you are stitching with rope instead of thread! The weight of your thread makes a huge difference and that’s why I highly recommend 50wt cotton thread for piecing: the thread is strong enough to hold the fabric together without breaking but thin enough not to produce too much bulk or take up too much room in the pressed seam allowances.
What exactly is a scant 1/4″ seam?
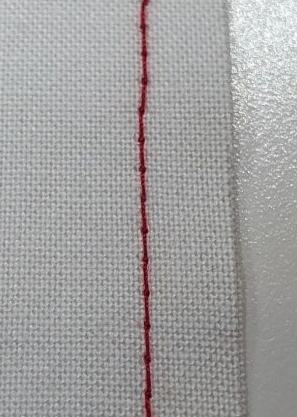
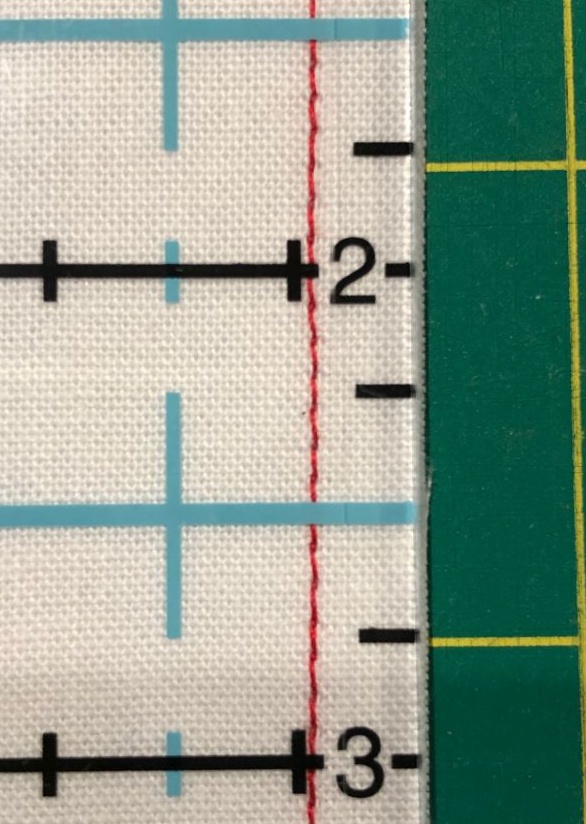
Quite simply, a scant 1/4″ seam is about three fibers (in the cotton fabric) shy of a full 1/4.”
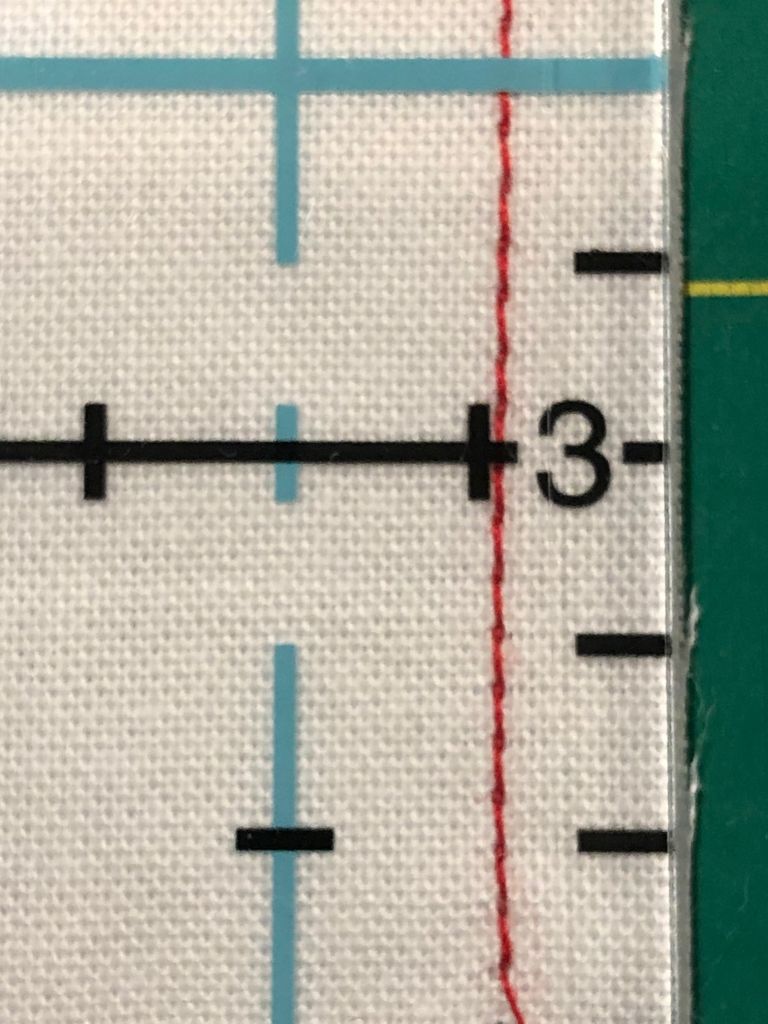
This extreme close-up shows the cotton fibers. If you count the fibers from right to left, you’ll see two to three fibers from the red thread to the center of the black 1/4″ vertical line on the ruler.
This scant quarter inch seam allowance leaves enough room to allow for the “fabric bulk” so when the seam allowance is pressed to one side, the units will still measure properly and the block isn’t too small.
Now that you know what a scant 1/4″ seam should measure, how do you achieve it?
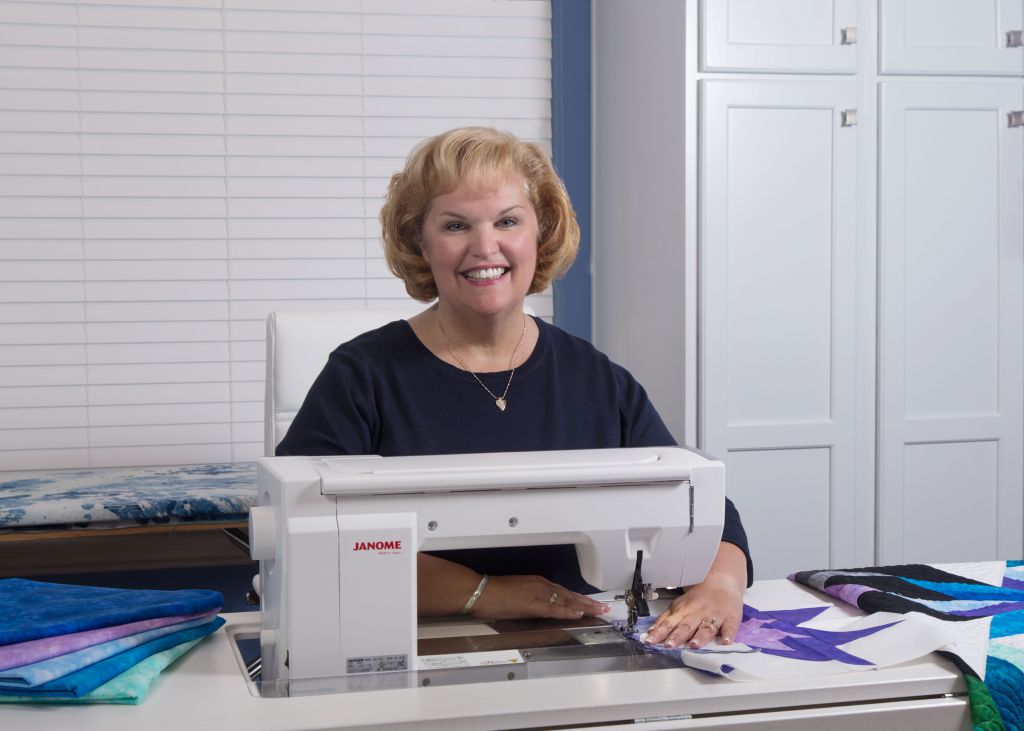
Fortunately, there are many options to help you achieve the perfect scant 1/4″ seam. For me, the most perfect scant 1/4″ seam ever is sewn with the HP foot (which stands for High Performance) and is available on the Janome Memory Craft 15000, the Horizon Memory Craft 9400 and the newest in the Professional Series, the 9450 QCP. This fabulous foot and throat plate system is beyond amazing. (You can read my review of this system by CLICKING HERE and HERE.)
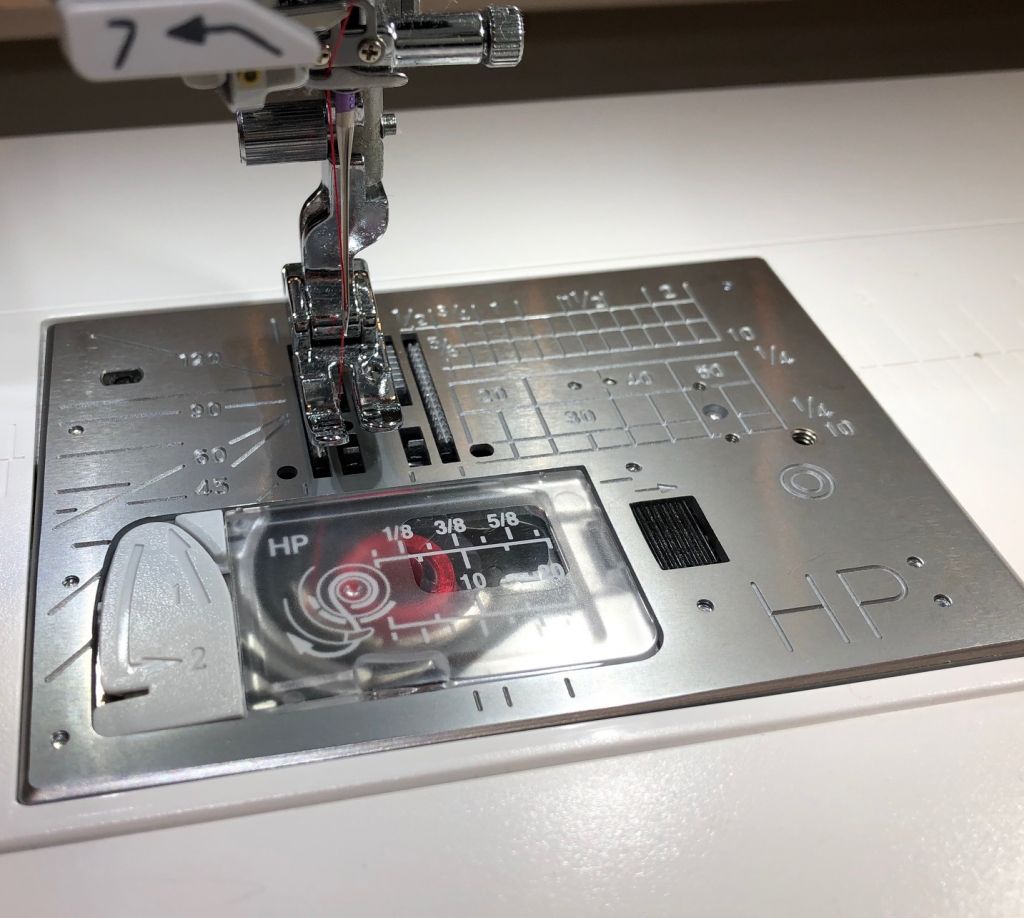
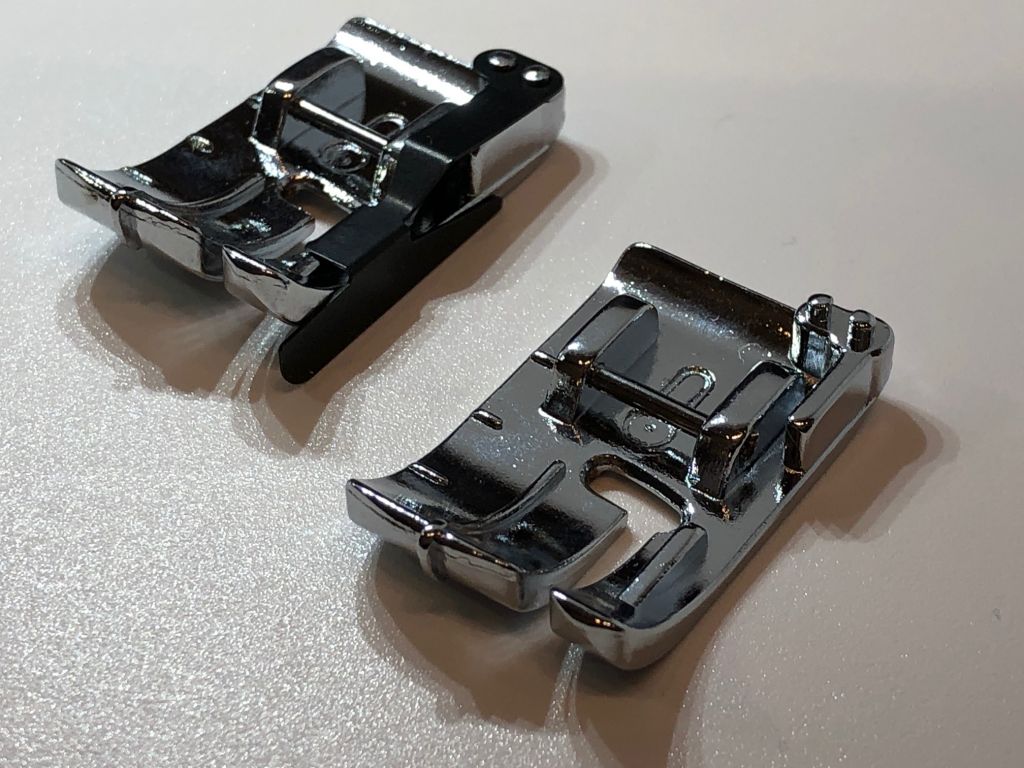
The HP presser foot and throat plate.
When you have the HP foot installed on your machine, it aligns the needle to the left position which is actually directly over the hook and loop mechanism so you’ll get the most perfect stitches available anywhere. The tension and balance of the stitches are second to none. Seriously, the quality of the stitching is that good. The throat plate itself has a single hole for straight stitching which won’t allow any fabric to be caught in the bobbin casing area. The HP foot is smaller than a typical 1/4″ piecing foot but within a few minutes you’ll feel absolutely comfortable and wonder why you ever hesitated to switch to the HP system.

When the HP foot and plate are installed on your machine, it will automatically limit you to the stitches which can be used with this system. It’s totally “goof proof.”
Proper fabric alignment.
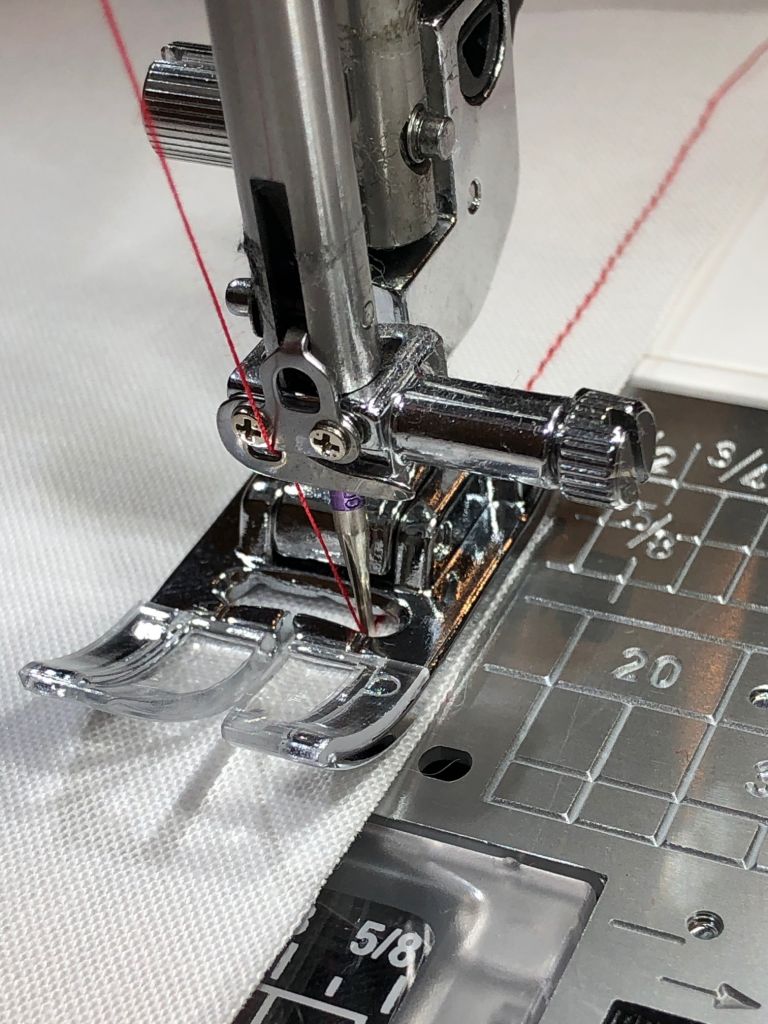
It’s easy to align the fabric to the right edge of the HP foot to achieve the perfect scant 1/4″ seam allowance. I used to love sewing with a 1/4″ piecing foot with a guide. But with the HP foot, I don’t need the guide because it’s so easy to align my fabric with the edge of the foot. To be clear: the fabric aligns to the right edge of the foot but does not extend even a teensy bit beyond the foot itself. Look at the succession of photos below. The photos are taken without my hand moving the camera and as I sit directly in front of my machine, the fabric aligned with the HP foot looks like this:
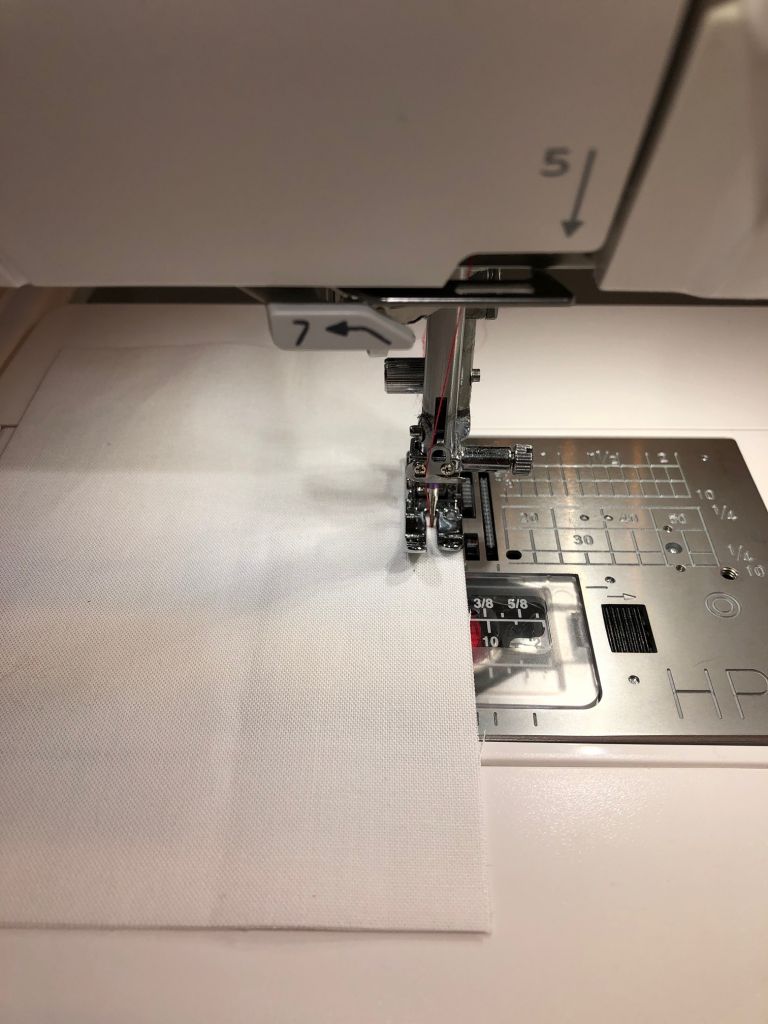
Sitting directly in front of the machine, look at how I have aligned the fabric with the right side of the HP presser foot.
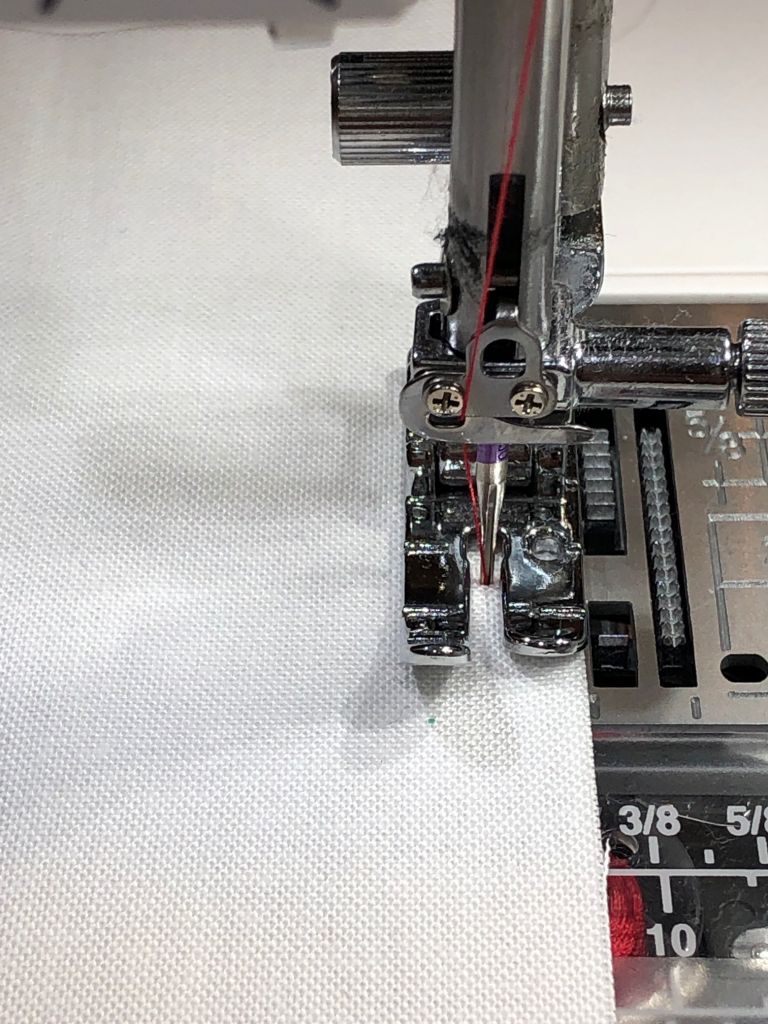
As I zoom in, I have not moved my hand or the camera.
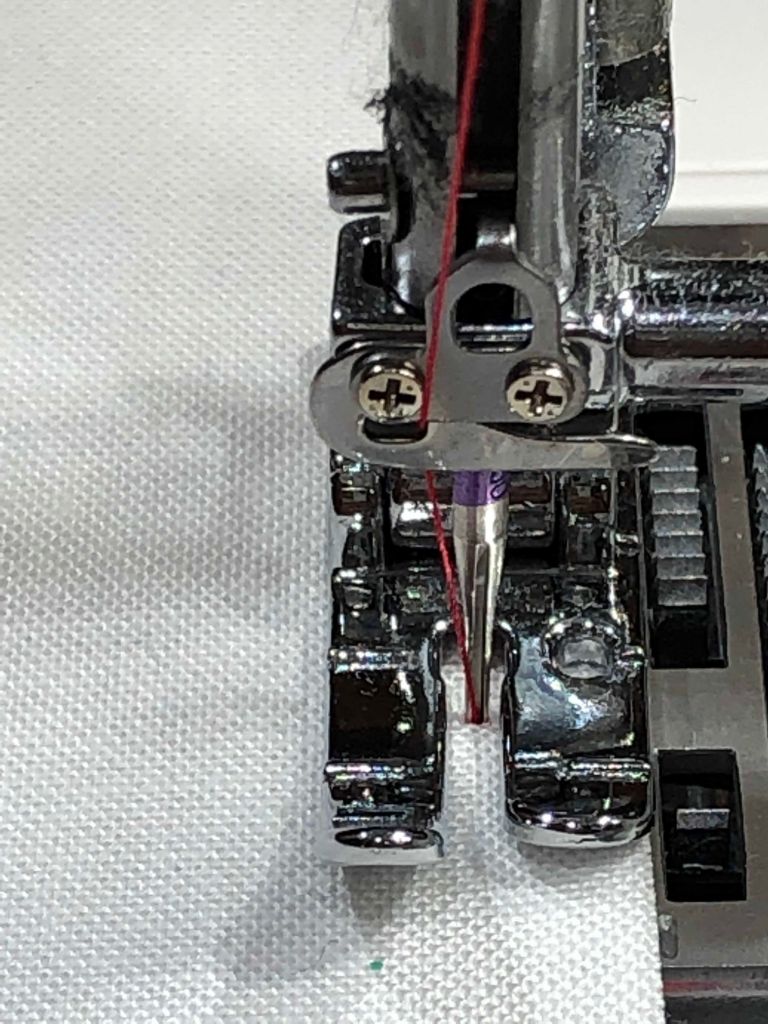
Finally, in this extreme close up, you can see the fabric is perfectly aligned with the right edge of the HP presser foot. It does NOT extend past the foot.
It may take some experimentation and practice on your part. Or you may get it right on your first try! But really, it’s about finding your own personal “sweet spot” when you align the fabric to the edge of the foot as you stitch your scant 1/4″ seam.
A side view looks like this:
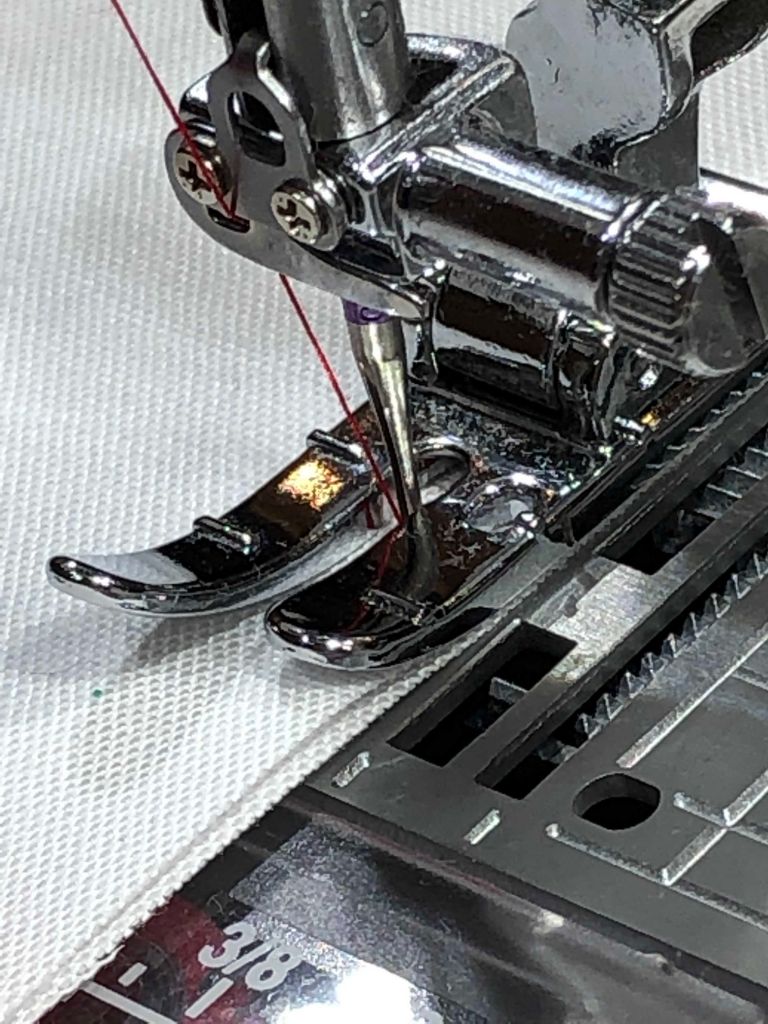
Simply allow the HP foot and the feed dogs do the work of pulling the fabric underneath the presser foot. Your hand will simply act as a guide to keep the fabric straight as you sew. And here’s another great tip: the HP system is absolutely brilliant when it comes to achieving perfectly curved piecing, too!
Still not convinced?
If you try the HP system and find that it just doesn’t feel comfortable to you, that’s perfectly okay because Janome has many other outstanding 1/4″ presser feet and there will be one or more that feels natural and will suit your individual needs! And that’s truly what quilting is all about: being comfortable and having fun while you stitch so you get the most perfect results.
For starters, there is the ultra-popular and much-loved O foot and it comes with or without the guide on the right side of the foot!
The O foot, comes with or without the metal flange, or guide, on the side for true piecing perfection.
But there are even more options to help you get that perfect scant 1/4″! If you haven’t already done so, be sure to check out Janome’s clear quarter inch presser feet options. There is the OV foot and the OM foot with red markings to help you align seams and turn corners with ease when you’re piecing.
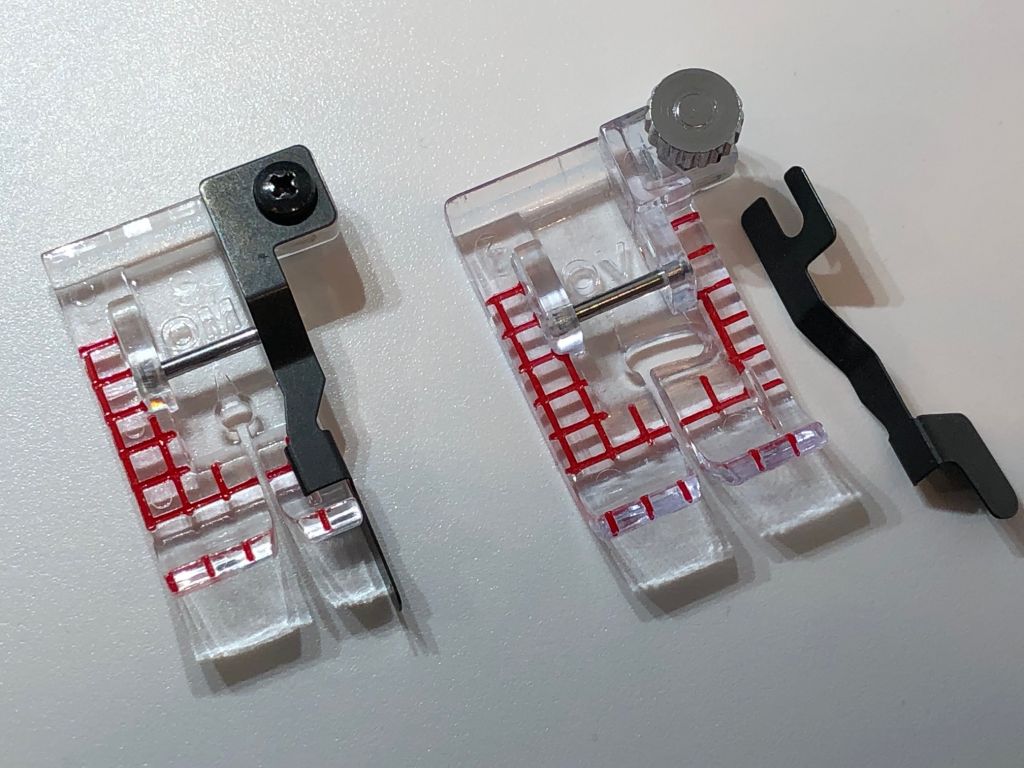
There is the OV foot (right, shown with the optional metal guide which easily attaches as needed) and one of my most favorite presser feet, the OM foot, which keeps the needle in the center position when attached to the machine.
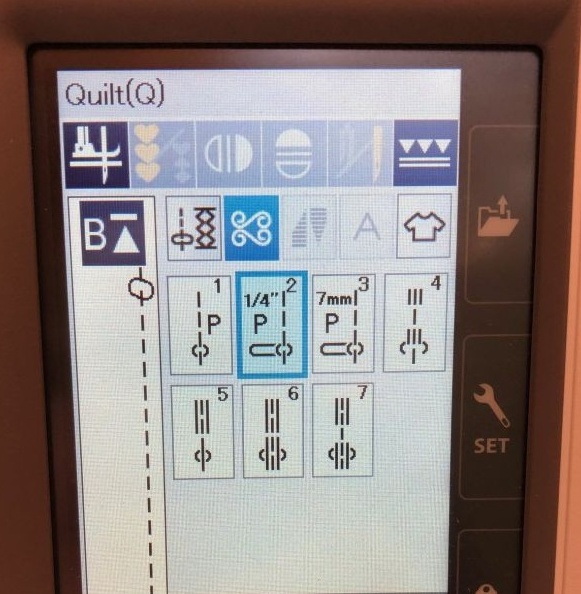
And if you’d rather not use a quarter inch presser foot at all, there are still more choices. You can select the A presser foot which comes standard on the machine, and simply adjust the needle position and use the 1/4″ stitch from the menu of stitches as shown below!
The A, or multi-purpose foot, and the 1/4″ stitch (from the stitch menu) combine to give you a perfect scant 1/4″ seam.
And that’s not all…
There are so many options available to help you find your own personal scant quarter inch seam. Once you find the 1/4″ presser foot that suits you best, you can tweak the stitch settings even more by moving the position of the needle! In fact, on the Memory Craft 15000, Creative 9400, and Professional 9450, there are 92 needle positions so you can adjust the needle until the seam is absolutely perfect and feels comfortable for YOU.
Just think about that for a minute: there are 92 needle positions!
So now that you know what a perfect scant 1/4″ seam allowance should look like, I encourage you to take a few minutes and practice stitching a scant 1/4″ seam. Take the time to measure and make adjustments accordingly until your seam allowance is perfect. Once you find the “sweet spot” for you — you’ll see dramatic improvements in your piecing overall.
It’s all about having fun.
Ultimately, you shouldn’t feel stress, pressure or angst. Quilting — piecing in particular, is supposed to be fun and relaxing. Don’t stress yourself out while you find your personal perfect scant 1/4″ seam. Just practice. Take your time. Experiment with the HP foot. Experiment with your own 1/4″ foot, no matter your machine make or model. Adjust the needle positions (if your machine has that option) until you find the position which works the best for you. And if you’ve never tried the HP system, I personally invite you to visit your local Janome dealer. Just tell them I sent you. Ask to see the HP foot in action and try it yourself. I think you’ll just love it like I do. And remember, the perfect scant 1/4″ seam is truly within your grasp.


Thanks so much for the info on the different types of 1/4″ feet!! Very informative!! I’m so tempted to upgrade my Janome MC6300, but I truly enjoy it and I’m a little nervous that I wouldn’t like another model as well!! Michelle Caldwell, OK
Wonderful article. Thank you for all the information about achieving the perfect 1/4”. Well said!
Kim, as always you are inspiring. I always start each project with the intent that this will be the *one*, perfect seams, no fudging…and at some point perfect 1/4” tends to waiver. Thanks for the article with hints to keep me on track. I am working on your Lone Star now and nothing will do but perfect scant 1/4. I will use these tips for sure.
Thanks for the great article on the scant 1/4″. I have been using it for a number of years since taking a class with John Flynn and then being in three of your classes. Happy Thanksgiving to you and your family.
Really helpful and informative. Thank you.
Loved reading this article about reinforcing the scant 1/4” seam with the HP foot and the 50 wt thread. Very good information. Thank you.
Thank you for the information on the 1/4 inch feet. I just got my 9450 and I’m still learning. I’m going to my dealer for my instructional session Thursday and I’m looking forward to it. I do love this machine!
Fabulous news! How exciting for you!!!
Thank you so much for writing this article. This is exactly the information I have been seeking regarding achieving the scant 1/4″ seam on my new 9400!
You’re so welcome, Erin! So excited to hear you have a new 9400! I could be happier for you because I KNOW you’re going to love it!
I got my 9400 about a month ago and I love it. I didn’t think I would ever replace my 6600 but I’m glad I did and now I know I can replace it. Your article on the quarter inch seam was wonderful. I’m looking forward to my first instructional session very soon. Thank you so much. I look forward to many more informative articles.
Sew excited for you, Barb!! You’re going to LOVE that machine. And stay tuned — I’m always working on new things to share!
Kimberly ,TY for the info. I have a Janome Skyline 5 with the OV foot . I use the metal guide and put the needle position the farthest it can go to the right (9.0) It is def not scant in fact it’s about 1 thread over 1/4. I love using the guide as it helps me so much,so my question is : is there a difference in 1/4″ with this foot between the skyline and machines you mentioned? I like Janomes a lot and would trade up if I could get the scant with using the foot with the guide. TY for you help!
Hi Lynn! I’m so glad you left a comment and I think I can help. There are probably more than one options for you — because honestly, I like sewing with the guide, too! May I ask,…..where do you live? Who is your local dealer? The reason I ask is this. I’m in Atlanta at this very moment with almost every US dealer. I’d love to get with your local dealer and talk with him or her about giving you a personal demo on how to use the foot to get a scant 1/4″ seam…. so if you’ll email me your location (moc.omnieylrebmiknull@ylrebmiK) I’m on it and will be in touch with you personally!
Can I get the hp foot and plate for my Janome MemoryCraft 11000?
Unfortunately, no. The HP foot and plate came out for the 9450, the 15000 the 9400 and the new M7. It might be time for an upgrade?
Hi Kimberly. Love this tutorial. I have read it more than once it is the best explanation for quarter inch i have ever found. I am loving my new janome 9450 especially since i took a class on it and can do more. Can you tell me if i can get a better scant quarter inch with hp plate and hp2 foot or would the result likely be the same.. thank you
Maureen –
Thank you so much for taking the time to comment. Congratulations on your new 9450; you’ll love it as much as I do I’m sure! (I actually had the chance to do some piecing with the HP plate and HP2 foot today.
To answer your question, you’ll get the same scant 1/4″ seam allowance with either the HP foot or the HP2 foot.
Thanks again for reaching out. I’m so thrilled for you! ?
Kimberly
The information is quite helpful.I now understand scant 1/4 inch seam. How can I get the accuracy required with a basic sewing machine (not a Janome, or other quilting-specific sewing machine)? I’m new to this hobby and until I’m sure I’ll stick with it, there’s no budget for a specialized machine. Can you help?
It takes some practice no matter what machine you are using! Get some scrap fabric and your choice of presser foot (if your machine comes with a 1/4″ foot, start there) and start stitching straight seams. Then measure from the edge of your fabric. Use a clear, reliable ruler and make adjustments — like adjusting the needle position — until you have that perfect scant 1/4″!
WOW! Just what I needed to know! I too loved the O foot with the guide bar on my DC 5100. However, I always wondered how to achieve the scant 1/4”. This new HP foot is truly amazing! It reminds me of my mother’s old mechanical Necchi that I learned to sew on, just a few years ago, HA! It is so very easy to use. The stitching is perfect. I do not anticipate switching it out for another foot any time soon unless to use the acufeed foot.
I also appreciated the tip about using the A foot and the Quilt 1/4” mode. I will have to experiment with that just for fun. I wonder how it would work with some decorative stitching. Thank you so much for the tips! Keep them coming!
So I am guessing the plate & HP foot won’t fit on my Babylock Destiny. Can you verify?
Toni Vanwormer
Toni
Unfortunately, no. The HP (High Performance) foot and plate system is a patented system exclusive to Janome only. I’d recommend trying it for yourself at a local Janome dealer!
Thank you Kimberly. Your information was amazing on the different 1/4 inch feet and how to achieve a perfect 1/4 inch scant. I bought a 9450 qcp two months ago ad picked it up curbside at Fabric Garden in Madison,Maine. I traded in my 8200qcp that was six ears old as I was disappointed in the free motion quilting results and constant birds nests. In other words, I jus wanted something better! I’ve sew for 62 years. Love my 9450! The learning curve was not quite so steep since I carried over skills rom my 8200. Due to Covid-19, I have had no classes and have bought the Workbook. I kept my extra optional Acufeed feet from my 8200. I tried using my 1/4 inch foot for my acufeed device and it drags at 1.8 stitch length…. also have the other optional feet…open toe, straight stitch, regular foot and stitch in the ditch. Do all of these acufeed feet still work well on the 9450? Didn’t have too much luck on the 1/4 inch. So just wanted your opinion. Thanks.
Cathy – I’m so glad you’ve upgraded to the 9450! It is such a fabulous machine! That pesky default 1.8 stitch length needs to be adjusted to 2.4 or 2.5….and then the Acufeed feet should work beautifully! I’m not 100% positive that the feet are all compatible from the 8200 to the 9450, so best to check with your local dealer (a phone call should do it) or contact Janome Customer Service at: 1-800-631-0183.
Are you on Facebook and if so, have you checked out the Janome Sewing Machines page and the Janome Sewing Classroom page? If not, don’t wait! You’ll see so much fabulous FREE content and videos that I and the other talented educators have been producing since early April! There is so much we have shared which is pertinent to your machine and you’ll learn so much by watching them. So scroll on back to see classes and tutorials galore. And if you haven’t tried your HP foot and plate yet, that’s the very FIRST thing you should do. It makes all the difference in the world!
I have a Janome Skyline S7, and I have been using the O foot and the 1/4″ seam setting available under the Quilt menu, which positions the needle at 8.3. I do have some patterns that call for using a scant 1/4″ seam. If I use the 8.3 setting as a starting point and then move the needle further to the right (to 8.4 or 8.5, for example) would that be a good way to achieve the scant 1/4″ seam? Thanks for advising a beginner!
Happy to help, Connie! Yes, you’ll want to move that needle position to at least 8.5. Stitch a seam and use a ruler to measure. I think you’ll find you actually need to move the needle position to 8.7 — but it will take a bit of experimentation to find the “sweet” spot!
I just got my S7. The first thing I did was to save my scant seam allowance. I use 9.0 needle position and stitch length 2.2.
I did test this and found it works perfectly. I did try 8.7 first but found my 2 1/2 stripes when sewed together were slightly wider that 2″ finished and pressed
Thank you for the wonderful explanation of all the ¼” feet for our Janome machines. I have several of the machines you mention, and many previous machines that have been traded or given to my daughters, and daughter in law.
I wasn’t very good at sewing the ¼” seams, but have been working on perfecting the technique on my 1 year old Continental M7 – that machine is AWESOME. I think I’ve finally got it down, using the HP2 foot as I like the acufeed flex. I know that for piecing that might be a little over-kill and I will also try to get this technique perfected on my 15000 and S9, both have the HP system installed. I would like to get the same perfection with the HP foot and even the other methods you’ve described as well.
It’s a shame that I had to get to be 75 years old to start on this journey of perfection, but I guess anytime is a good time to start.
I’m a very happy camper and a “Janome Girl” through and through.
Thanks for helping out a seasoned sewist of over 50 years.
There’s no better time than right now — no matter the age or stage of your life — to find the fun in sewing! I’m so glad you took time to comment and I’m delighted to know you’re enjoying the M7. You’re going to love that machine for years and years to come!
I have HD on my Memory Craft 6700P which comes with HP foot and plate. Will it work for the scant 1/4 “?
Yes!
I bought my Horizon MC9450 2nd hand so have not had instructional lessons. I am not a quilter, I just love sewing bags, wallets and soft furnishings. Please please please, can you explain how I can get a 1/8” seam and 1/4” seam without having to Change presser feet or needle plate. Those are the 2 seams I use every day, seaming and top stitching. If I use the HP2 foot and HP needle plate the needle position is fixed. Please Help.
Hi Pam! First, congratulations on your 9450 purchase! You’re going to love this machine. Oh, how I wish I could sit down with you in person and show you everything this marvelous machine can do! But unfortunately, I can’t do that here in the comments section of my blog. The best thing to do is find the nearest Janome dealer and visit them. Ask about paying for owner’s classes. They are entirely worth the investment. Next, do a search on YouTube — there are so many videos of how to find the seam settings you are looking for. There isn’t an 1/8″ seam adjustment on the machine itself, but you can find that simply by moving your needle position to the far right and using the A or F foot. As for the 1/4″ seam, under the Quilt Stitches menu, the second stitch is specifically for a 1/4″ seam. Touch the button and you are now set up to sew a perfect 1/4″ seam! And finally, do check out all the wonderful and instructional videos on the FB Janome Sewing Machine page. They are free! It will take some time and a bit of learning on your end but the results will be totally worth it!
I have the S7 and have been sewing with the HP quarter inch foot making a quilt. I switched over to make a bag and now that I try the HP 1/4″ foot again my thread tension looks awful on the same settings I used before.
I have cleaned, rethreaded a million times and can get clean stitches on the 1/4″ foot with guide (O) foot.
Any suggestions?
Carolyn –
Yours is not a typical experience. I would once again remove the throat plate and bobbin casing, carefully vacuum the bobbin casing area, then put everything back together. Unthread the machine and use a completely different bobbin. (Make sure you are using the yellow diamond bobbin casing unit — the one that comes installed in the machine.) Then turn the machine off for a minute or two before turning it back on and rethreading. If it still doesn’t reset, call your local dealer and ask for their opinion and advice. Let me know how it goes!
Hi Kimberly, I have Janome 6700P (3yrs) and I truly love this machine and what it can do for my sewing, FMQ (and quilting on a frame!). It’s extremely sturdy and I enjoy all the great features, including the HP plate (which is just 1 of 3 plates incl w/machine!). The scant 1/4″ foot is a dream and works so well. No more guesswork to achieve that perfect scant stitch width. This is my 3rd Janome ‘upgrade’ – but I truly don’t feel any need to trade up to anything else. It does everything I need – and does it so well!
kind regards from a very Happy quilter!
Carol –
You are the reason why I love Janome so much — you’re a very happy customer and sewist! Thank you so much for taking the time to write and share your experiences with your fabulous 6700P. I’m grateful for YOU!
I just purchased the 6650 a it’s a little lighter than my 11000 which I love.Great info on the hp as I’m waiting for my plate to come in.
Gale